|
 |
|
Windows 95/98/98SE Dial-up Setup
Verify modem properly installed and using a recent driver.
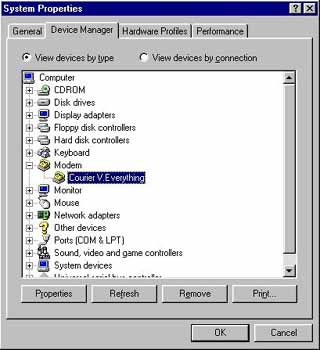
Click on the "Start" button, go to "Settings", click on "Control
Panel", and double click on the "System" icon.
 Click on the "Device Manager" tab, then click on the "+" next to "Modem" in the list of devices. Click on the name of the modem once to highlight it.
Click on the "Properties" button at the bottom of the System Properties dialog box, this will open a Modem Properties dialog box.
Make sure the modem type is NOT "Standard Modem", as that would indicate an improperly installed and/or improperly configured modem.
{If that is the case advise customer to contact their computer manufacturer or a qualified technician for service to the modem or to obtain
the correct drivers to properly identify the modem before proceeding with setup.}
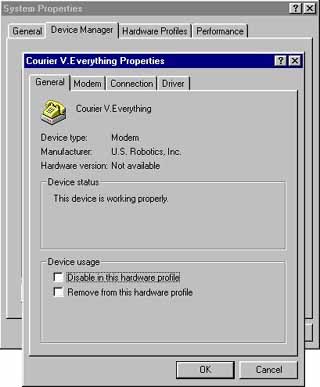
Verify that the device status says, "This Device Is Working Properly" under the General Tab, If ANY error exists DO NOT
PROCEED until the error has been corrected and the modem is working properly.
Click on the "Drivers" tab at the top of the Modem Properties dialog box and verify
that the driver date is reasonably current. (Usually not older than 12 to 18 months old)
Verify what network components are running on users computer. Install any necessary networking components that aren�t currently installed.
Click on the "Start" button, go to "Settings", Click on "Control Panel", and Double click on "Network".
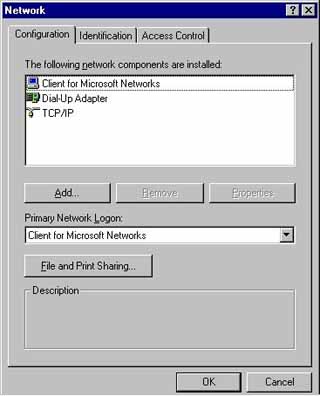
Under the Configuration tab verify that the following networking components exist:
"Client For Microsoft Networks" "Dial-Up Adapter" "TCP/IP" (NOTE: If more than one network adapter exists one of
the TCP/IP statements should read "TCP/IP (Dial Up Adapter)" in the configuration
window, if no other network exists it will be "TCP/IP"
If all components are properly installed proceed To "Configure dial-up networking for connection to Blueone.net".
If not, follow the appropriate steps listed next.
{NOTE: Before starting ANY of the listed network component installations be sure the
customer has their operating system (Windows 95/98) CD available as it will almost always be required!}
Click on the "Add" button in the Network dialog box to bring up the "Select Network Component Type" dialog box. Highlight the Component type
you want to add.
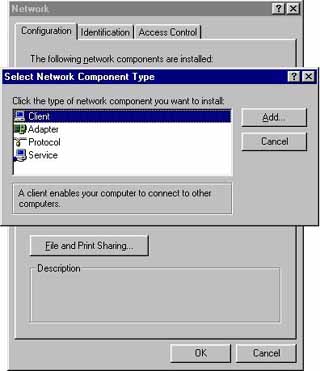
For "Client for Microsoft Networks", highlight "Client" then click on the "Add" button to bring up the "Select
Network Client" dialog box. In the "Manufacturers" window select "Microsoft", and in the "Network Clients" window select "Client
for Microsoft Networks". Click on the "OK" button. You will be returned to the "Network" dialog box, in the "Primary Network Logon" field click
on the down arrow to the right of the field and select the client you just added. At this time you can proceed to the installation of the next
item below if needed or click on the "OK" button in the Network dialog box and follow the prompts to make the changes complete.
For "Dial-up Adapter", highlight "Adapter" then click on the "Add" button to bring up the "Select Network Adapter" dialog box. In the "Manufacturers" window
scroll down and select "Microsoft", and in the "Network Adapters" window select "Dial-up Adapter" then Click the "OK" button. You will be returned
to the "Network" dialog box. At this time you can proceed to the installation of the next item below if needed or click on the "OK" button
in the Network dialog box and follow the prompts to make the changes complete.
For "TCP/IP", highlight "Protocol" then click on the "Add" button to bring up the "Select Network Protocol" Dialog box. In the "Manufactures" window
select "Microsoft", in the "Network Protocols" window select "TCP/IP" then click the "OK" button. You will be returned to the "Network" dialog box.
At this time you can proceed to the installation of the next item below if needed or click on the "OK" button in the Network dialog
box and follow the prompts to make the changes complete.
Configure dial-up networking for connection To Blueone.net
Double click on the "My Computer" Icon to open the "My Computer" window.

Double click on the "Dial-Up Networking" folder to open the "Dial-Up Networking" window.

If no previous dial-up network exists In Windows 95:
If no previous dial-up network exists in either version Of Windows 98�, A "Welcome To Dial-Up Networking" window will appear. Click "Next" to proceed to the "Make A New Connection" dialog box.
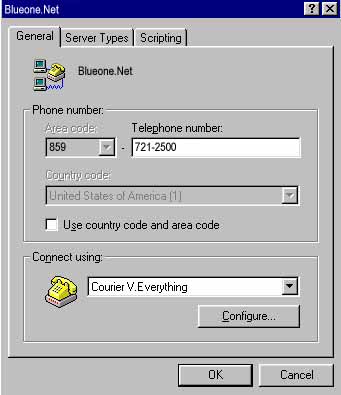
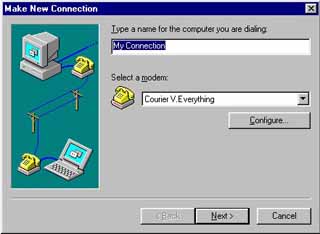 Enter the name "Blueone.Net" in the "Type a name for the computer your dialing:" field. Verify the properly installed modem from "Step 1" Is selected In the "Select a modem:" field. Click on the "Next" button.
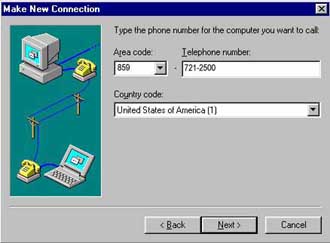
Enter the phone number for the Dial-Up Networking Connection you are creating. You may choose your number HERE The next screen of the dialog box should state, "You have successfully created a new Dial-Up Networking Connection Called: "Blueone.Net"
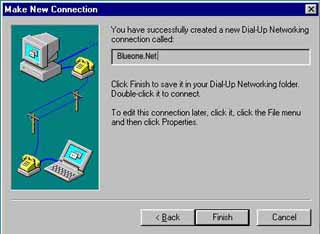
Click on the "Finish" button to close the "Make New Connection" dialog box. It will create an icon named "Blueone.Net" In the "Dial-Up
Networking" folder.

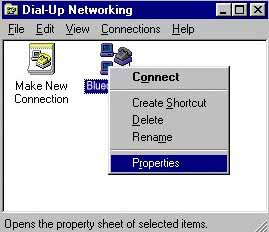
Right click on the "Blueone.Net" icon to open the "Icon Option List". Left click once on the word "Properties" to open the dialer
properties dialog box.
If using Windows 95 remove the check in the check box named "Use Country Code And Area Code" by clicking on it once. In Windows
98 the check box is named "Use Area Code And Dialing Properties".
Click on the "Server Types" tab at the top of the dialer properties box.
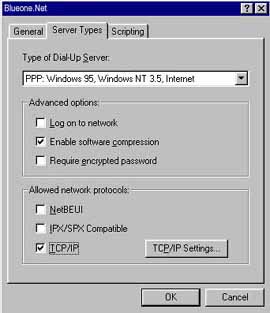
Under "Advanced Options" verify the ONLY option with a check mark Is "Enable Software Compression" Under "Allowed Network Protocols" verify the ONLY item with a check mark next to it Is "TCP/IP". Click "OK" to complete your Dialer Setup. Once all "Dial-Up Networking" components are confirmed to be properly installed and configured move on to E-Mail client and browser installation and configuration
|
|
 |
|
|
|
|